Inputting data into the table.
Click the tab labeled "Insert" - and another window should appear, like this.
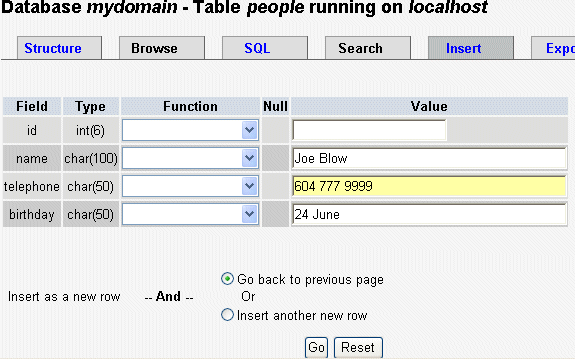
Now type in the details for each of the fields for this record. The "id" column was set to automatically increment so you do not need to enter a number.
Note - if you ever get lost with phpMyAdmin navigation click "Home" in the left hand nav bar and start again.
Now click Save and the record is saved to the people table.
The previous window reappears with the SQL command for the insert. You can keep adding recordsby re-selecting Insert".
For multiple records, you can select the "Insert another new row" radio button on the input form.
The previous window reappears with the SQL command for the insert. You can keep adding recordsby re-selecting Insert".
For multiple records, you can select the "Insert another new row" radio button on the input form.
When you've finished entering several records into the table, you can check them by clicking on the Browse tab. You can click on individual records for editing or deleting.

You can use the Select tab to refine your display when your database starts grows to many pages of records.
Backup your data
You "don't know what you've got 'til its gone"!
- Click on your database name in the left hand navigation bar
- Click on EXPORT (top tab)
- Highlight the table/s you want to back up
- Select STRUCTURE and DATA radio button
- Highlight the table/s you want to back up
- Select STRUCTURE and DATA radio button
- Select "Enclose table and field names with backquotes"
- Select "Save as file" and "zipped" check boxes
- Click "Go" and a zipped archive file will be generated.
- Select "Save as file" and "zipped" check boxes
- Click "Go" and a zipped archive file will be generated.
Well done! - you've created a database, a table and fields, entered in a few records, viewed the records, edited and perhaps deleted some of them and practised backing up.
<<< PREVIOUS NEXT >>>
<<< PREVIOUS NEXT >>>
No comments:
Post a Comment